No edit summary |
(These don't appear in the Deep Grand Reef.) |
||
| (10 intermediate revisions by 8 users not shown) | |||
| Line 1: | Line 1: | ||
| − | '''Harvesting Nodes''' are mineral deposits that can be broken up by the player to reveal the materials inside. Each Harvesting Node drops a different set of [[Raw Materials]]. |
+ | {{SubnauticaLink|Harvesting_Nodes}}'''Harvesting Nodes''' are mineral deposits that can be broken up by the player to reveal the materials inside. Each Harvesting Node drops a different set of [[Raw Materials]]. |
While Harvesting Nodes can be broken by the players hands, many tools have bash animations to break them. Harvesting Nodes, despite their static nature, can be picked up and launched by the [[Propulsion Cannon]], and will break on impact. |
While Harvesting Nodes can be broken by the players hands, many tools have bash animations to break them. Harvesting Nodes, despite their static nature, can be picked up and launched by the [[Propulsion Cannon]], and will break on impact. |
||
| Line 15: | Line 15: | ||
* [[Silver Ore]] |
* [[Silver Ore]] |
||
| style="text-align:left; font-size:12px;" | |
| style="text-align:left; font-size:12px;" | |
||
| − | * [[Reefback]] |
+ | * [[Reefback Leviathan]] |
|- |
|- |
||
| − | | style="text-align:center; font-size:12px;" |[[File: |
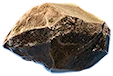
+ | | style="text-align:center; font-size:12px;" |[[File:Ic_LimestoneChunk_22743.png|128px|center|link=Limestone Outcrop]][[Limestone Outcrop]] |
| style="text-align:left; font-size:12px;" | |
| style="text-align:left; font-size:12px;" | |
||
* [[Copper Ore]] |
* [[Copper Ore]] |
||
| Line 24: | Line 24: | ||
* [[Crag Field]] |
* [[Crag Field]] |
||
* [[Crash Zone]] |
* [[Crash Zone]] |
||
| − | * [[ |
+ | * [[Crash Zone Mesas]] |
| + | * [[Dunes]] |
||
| + | * [[Dunes Caves]] |
||
| ⚫ | |||
* [[Grassy Plateaus]] |
* [[Grassy Plateaus]] |
||
| + | * [[Grassy Plateaus Caves]] |
||
* [[Kelp Forest]] |
* [[Kelp Forest]] |
||
* [[Kelp Forest Caves]] |
* [[Kelp Forest Caves]] |
||
| ⚫ | |||
* [[Lava Geyser]] |
* [[Lava Geyser]] |
||
| + | * [[Lost River]] |
||
| ⚫ | |||
* [[Safe Shallows]] |
* [[Safe Shallows]] |
||
* [[Safe Shallows Caves]] |
* [[Safe Shallows Caves]] |
||
| − | * [[ |
+ | * [[Sea Treader's Path]] |
| + | * [[Sea Treader's Tunnel Caves]] |
||
* [[Sparse Reef]] |
* [[Sparse Reef]] |
||
| + | * [[Underwater Islands]] |
||
|- |
|- |
||
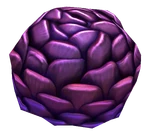
| style="text-align:center; font-size:12px;" |[[File:Purple Pinecone Flora.png|150px|center|link=Purple Pinecone]][[Purple Pinecone]] |
| style="text-align:center; font-size:12px;" |[[File:Purple Pinecone Flora.png|150px|center|link=Purple Pinecone]][[Purple Pinecone]] |
||
| Line 39: | Line 46: | ||
* [[Salt Deposit]] |
* [[Salt Deposit]] |
||
| style="text-align:left; font-size:12px;" | |
| style="text-align:left; font-size:12px;" | |
||
| ⚫ | |||
* [[Mushroom Forest]] |
* [[Mushroom Forest]] |
||
|- |
|- |
||
| − | | style="text-align:center; font-size:12px;" |[[File: |
+ | | style="text-align:center; font-size:12px;" |[[File:Ic_SandstoneChunk_22997.png|128px|center|link=Sandstone Outcrop]][[Sandstone Outcrop]] |
| style="text-align:left; font-size:12px;" | |
| style="text-align:left; font-size:12px;" | |
||
* [[Gold]] |
* [[Gold]] |
||
| Line 50: | Line 56: | ||
* [[Bulb Zone]] |
* [[Bulb Zone]] |
||
* [[Crash Zone]] |
* [[Crash Zone]] |
||
| + | * [[Crash Zone Mesas]] |
||
| + | * [[Deep Sparse Reef]] |
||
* [[Dunes]] |
* [[Dunes]] |
||
* [[Dunes Caves]] |
* [[Dunes Caves]] |
||
| + | * [[Grand Reef]] |
||
* [[Grassy Plateaus]] |
* [[Grassy Plateaus]] |
||
| + | * [[Grassy Plateaus Caves]] |
||
* [[Kelp Forest]] |
* [[Kelp Forest]] |
||
* [[Kelp Forest Caves]] |
* [[Kelp Forest Caves]] |
||
* [[Lava Geyser]] |
* [[Lava Geyser]] |
||
| + | * [[Lost River]] |
||
* [[Mountains]] |
* [[Mountains]] |
||
| ⚫ | |||
* [[Mushroom Forest]] |
* [[Mushroom Forest]] |
||
* [[Safe Shallows]] |
* [[Safe Shallows]] |
||
* [[Safe Shallows Caves]] |
* [[Safe Shallows Caves]] |
||
| + | * [[Sea Treader's Path]] |
||
| + | * [[Underwater Islands]] |
||
|- |
|- |
||
| − | | style="text-align:center; font-size:12px;" |[[File: |
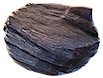
+ | | style="text-align:center; font-size:12px;" |[[File:Ic_ShaleChunk_23297.png|128px|center|link=Shale Outcrop]][[Shale Outcrop]] |
| style="text-align:left; font-size:12px;" | |
| style="text-align:left; font-size:12px;" | |
||
* [[Diamond]] |
* [[Diamond]] |
||
| Line 68: | Line 80: | ||
* [[Lithium]] |
* [[Lithium]] |
||
| style="text-align:left; font-size:12px;" | |
| style="text-align:left; font-size:12px;" | |
||
| + | * [[Blood Kelp Caves]] |
||
| + | * [[Blood Kelp Zone]] |
||
* [[Bulb Zone]] |
* [[Bulb Zone]] |
||
* [[Bulb Zone Caves]] |
* [[Bulb Zone Caves]] |
||
| − | * [[ |
+ | * [[Crag Field]] |
| − | * [[ |
+ | * [[Crash Zone Mesas]] |
| + | * [[Deep Sparse Reef]] |
||
| + | * [[Grand Reef]] |
||
| + | * [[Grand Reef Caves]] |
||
| + | * [[Inactive Lava Zone Corridor]] |
||
| + | * [[Inactive Lava Zone]] |
||
* [[Jellyshroom Cave]] |
* [[Jellyshroom Cave]] |
||
* [[Lava Geyser]] |
* [[Lava Geyser]] |
||
| + | * [[Lost River]] |
||
| ⚫ | |||
| + | * [[Mountains Caves]] |
||
| + | * [[Mountains]] |
||
* [[Mushroom Forest]] |
* [[Mushroom Forest]] |
||
* [[Mushroom Forest Caves]] |
* [[Mushroom Forest Caves]] |
||
| + | * [[Sea Treader's Path]] |
||
| + | * [[Sea Treader's Tunnel Caves]] |
||
| + | * [[Sparse Reef]] |
||
| + | * [[Underwater Islands]] |
||
| + | * [[Underwater Islands Caves]] |
||
|} |
|} |
||
| − | |||
| − | == Gallery == |
||
| − | <gallery> |
||
| − | SizeRefNodes.png|Size Difference between the '''Harvesting Nodes''' (outdated) |
||
| − | </gallery> |
||
== Trivia == |
== Trivia == |
||
| − | *Originally, there were five outcrops, which included [[Cut Content|Basalt and Obsidian]].These were removed, however. |
+ | *Originally, there were five outcrops, which included [[Cut Content|Basalt and Obsidian]]. These were removed, however. |
| + | [[fr:Gangues de minerai]] |
||
[[Category:Raw Material]] |
[[Category:Raw Material]] |
||
[[Category:Harvesting Node]] |
[[Category:Harvesting Node]] |
||
Revision as of 01:25, 30 August 2019
This article is about Harvesting_Nodes in Subnautica. Click here for information on this subject in Below Zero.
Harvesting Nodes are mineral deposits that can be broken up by the player to reveal the materials inside. Each Harvesting Node drops a different set of Raw Materials.
While Harvesting Nodes can be broken by the players hands, many tools have bash animations to break them. Harvesting Nodes, despite their static nature, can be picked up and launched by the Propulsion Cannon, and will break on impact.
Harvesting Nodes


Trivia
- Originally, there were five outcrops, which included Basalt and Obsidian. These were removed, however.